Dulce de Carne Membrillo

Quince cheese

image

image
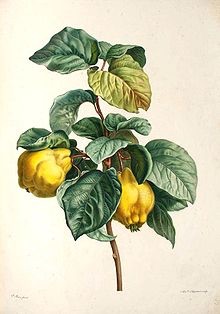
Quince is a member of the pear family and grows on trees of up to 8 metres high which fruit in the autumn. Their aroma is exquisite, however they are far too tart to eat raw and must be cooked.

In Spain dulce de carne membrillo (literally translated as sweet of quince meat) is typically eaten at Christmas with manchego, however it’s delicious with any full flavoured cheese. It’s a good idea to make it a couple of months prior to the festive season as this will allow the quince paste to harden into a cheese like consistency. We are lucky in the UK that quince trees are found in back gardens so if it’s a good year and there’s a bumper crop your neighbours will be more than willing to give you a few.

Makes about 500g

Ingredients
1 kg quince (5-6 quince)
500kg preserving sugar (depending on weight of quince pulp)
vegetable oil

Method

  1. Wash the quince and chop roughly (no need to peel or core).
  2. Place in a large pan with 0.75 litres of water. Bring to the boil and lower the heat to simmer until the quince have softened.
  3. Push the softened fruit and pan juice through a sieve to remove the skin and core.
  4. Now weigh the pulp and stir in the same weight of sugar into the fruit.
  5. Place the mixture back into the pan and gently bubble until the sugar has dissolved. The mixture should have thickened into a runny paste.
  6. Transfer the paste into a lightly greased baking dish/tray and cook over night (at least 10 hrs) or until the paste has started to solidify so that it can then be cut and handled.
  7. When cool cut into squares and wrap each one in greaseproof paper. Store in a cool dry place or in the fridge. It will become firmer with time so that it can be sliced when served.

Pollo al ajillo

Garlic chicken

image

This recipe is one of the most simple and delicious ways to cook chicken. The classic combination of garlic and white wine create a rich, mouth watering flavour and with a little time the chicken becomes succulent and falls off the bone. Served simply with bread, sautéed potatoes or saffron rice. All work well.

Back in the mid 1950s meat was infrequently eaten in the Soler household, however chicken was available and could be bought live from the local market – ( a sensible way to keep meat fresh in a hot climate where refrigeration was not available). Typically Mama Maria would choose a chicken and then take it home live. It would be her task to kill it and prepare it for the pot. The animal was portioned up, the giblets washed in vinegar and the carcuss used as stock. Nothing was wasted.

As a child I was fascinated by the sight of mum jointing a chicken at the kitchen table and would happily sit by her watching the process. Today I always buy a whole chicken and then portion it up at home rather than buying pieces of chicken from the supermarket. This makes buying good quality chickens cheaper and helps me connect with the food I eat.

Ingredients

1 chicken jointed into 10 pieces (2 drumsticks, 2 thighs, 2 wings, 4 breasts (cut in half).
8 tbs olive oil
8-12 cloves of garlic (whole)
1 large glass of white wine
3 bay leaves

Method

  1. Heat the olive oil and fry the chicken pieces gently over a medium heat for 10 mins or until golden.
    Add the garlic and fry for another 5 mins or until they turn a little golden
  2. Add the wine. Allow the alcohol to evaporate (it should lose its winey smell) and then turn down the heat. Add the the bay leaves and season.
  3. Cook for a least 1 hour or until the chicken is succulent, the juices are running clear and have reduced to a gravy consistency.
  4. Serve with bread, potatoes or rice.


Churros

image

I love churros but not the sweet chocolate coated variety you find at fiestas. The churros I grew up with were savoury, home made and eaten as a Sunday breakfast treat. Mum would make spirals of churros in a frying pan and then stack them in the centre of the kitchen table for the family to gorge ourselves on. So if you fancy doing something different this weekend, aren’t calorie counting and are prepared to get messy – you have to try this. Your nearest and dearest will love you for it!

I recommend eating your churros with a good coffee, followed by a fresh fruit salad.

As a child in La Linéa, Juani and her family would visit their local imageChurrería in El Barrio on Sunday mornings. The churros were fried in huge deep pans and either made into large spiral wheels (for an entire family) or into fingers as individual portions. The churros were eaten for breakfast with a hot drink of coffee, hot chocolate (Cola Coa) or in my mum’s case a cup of tea!

Ingredients
175g self raising flour
pinch of salt
150ml tepid water
300ml vegetable oil

Equipment
Piping bag with a 10mm round nozzle  (or a churros pipe)

Method

  1. Sift the flour into a large bowl and mix in the salt.
  2. Create a well in the middle of the flour and gradually add the water.
  3. Using a fork gradually combine the water into the flour until you have a thick batter
  4. Heat up the vegetable oil in a large frying pan.
  5. Spoon the batter into a piping bag.
  6. Once the oil is up to temperature (you can drop some of the batter into the oil to test it – once the batter sizzles it’s ready).
  7. Pipe the batter starting from the centre of the pan working outwards in a circular motion.
  8. Allow to fry over a medium to hot pan for a few minutes and then turn over to cook the other side. Your churro should be a golden colour.
  9. Place the churro on a plate covered  in a kitchen towel and serve immediately.

Tip: Make sure the batter is thick enough so that it keeps its form as it is piped into the frying. Otherwise it’ll end up like a pancake! Add a little more flour if it gets too thin.

Gazpacho

image
Like our British summer, these gazpacho shots are short sharp bursts of sunshine. The intense colour and refreshing, zesty flavour is perfect for hot days and is ideal as a starter at a BBQ or picnic.

Gazpacho originates from Andalucía and is typically eaten during its intense hot summers as a cold soup. It is incredibly easy to make using raw ingredients and if you are lucky enough to grow your own tomatoes and cucumbers then this is a great way to capture their full flavour.

Makes 1 litre

1 kg ripe tomatoes
1 long green pepper (or half a green bell pepper)
½ cucumber
1 clove garlic (skin removed)
1 slice of white bread /or 2” length of baguette
2tbs white wine vinegar
4 tbs of extra virgin olive oil
Pinch of salt

Method

  1. Roughly chop all the vegetables and ripped up the bread
  2. Add all the ingredients in a blender or large bowl/ saucepan (if using a hand held liquidiser) and blend until smooth. (Tip: If after blending the gazpacho is very thick and difficult to pour, try adding more cucumber to thin it, then whizz it up again).
  3. Enjoy immediately or chill for three hours before serving.

Tortilla de habas

Broad bean tortilla

image

This second tortilla recipe uses stewed whole broad beans which have a distinct flavour that works exceptionally well in a tortilla. Whole beans are often used in Spanish cooking but they need to be cooked for a long time to soften and must be young and tender. Otherwise they will be too stringy. This is a great recipe if you grow your own beans as you can pick them young and the pods which are usually discarded aren’t wasted. If you can’t get hold of young broad beans then runner beans can be substituted. I have added jamón serrano to add extra bite but this can be omitted if you want to keep your tortilla meat free.

This recipe makes a 20cm diameter tortilla and will serve up to 3 people as a main meal.

Ingredients
500g broad beans (in their pods)
3-4 eggs (whisked)
1 onion
2 slices jamón serrano (optional)
Olive oil
1 clove of garlic
salt

Method

  1. Finely slice the onion and the garlic. Top and tail the broad beans and remove any stringy bits. Then chop the bean roughly into lengths of about 5cm. Rip up the slices of jamón serrano into small pieces.
  2. Heat a good glug of olive oil in a large deep frying pan or saucepan and add the onion. Cook for 5 minutes and then add the broad beans, jamon serrano and garlic. Cook for 10 minutes, then season well and lower the heat. Continue to cook with a lid on, stirring occasionally and add a little water if it starts to stick. Cook for about 1 hour or until the broad beans are soft.
  3. Allow the the bean mixture to cool and then add them to a large bowl. Gently stir in the whisked eggs.
  4. Heat a small glug of olive oil in a small frying pan (20cm diameter) and pour in the ingredients. Cook on a low-medium heat for about 20 mins.
  5. When the tortilla is almost cooked through, take a plate and place it over the top of the pan. Toss the pan over the plate allowing the tortilla to slide onto the plate face down. Then slide the tortilla back into the pan with the uncooked side on the bottom. Cook for another 3-5 minutes.
  6. Serve will a simple salad.

Tortilla de patatas

Spanish potato omelette

image

Summer has arrived and with it a chance to picnic and enjoy eating outdoors. Tortilla is fantastically versatile and can be cooked the night before if you are planning a picnic, but is equally tasty as a simple meal served warm with cold meats and salad. The tortilla was a staple in the Soler household and continues in mine and my siblings. Growing up by the coast, the family would spend the whole day at the beach and of course Juani would bring a feast. I have very fond memories of being wrapped in a towel after playing in the sea and sand and enjoying a slice.

The secret of a good tortilla is allowing the onions to caramelise so they become sweet and seasoning generously to bring out the flavours.

This recipe makes a 20cm diameter tortilla and will serve up to 3 people as a main meal.

Ingredients

1 large onion
500g waxy potatoes
4-6 eggs (depending on size)
Extra virgin olive oil (to cook the onions)
150ml vegetable/ sunflower oil & 50ml olive oil (to cook the potatoes)
Salt

Method

  1. Chop the onion finely. Heat a good glug of olive oil in a large frying pan and sauté the onions until soft and sweet. This may take up to 30 mins.
  2. Meanwhile peel (optional) and slice the potatoes thinly (2mm thick), put then in a bowl and add salt to allow excess water to release. After 20 mins pat the the potatoes dry with kitchen towel.
  3. Season the onions and then remove from the pan and set aside.
  4. In the same pan heat the vegetable/ olive oil. When the oil is sufficiently hot (test with 1 slice of potato – when it starts to sizzle it’s ready) add the potatoes. Makes sure all the potatoes are covered with oil. Allow them to gently fry until soft but not toasted (10 mins).
  5. Remove the potatoes and place on kitchen towel to remove the excess oil.
  6. Once the potatoes have cooled, carefully place them in a bowl and add the onions.
  7. Whisk the eggs in another bowl and then add to the potatoes and onions. Stir gently.
  8. Heat a glug of olive oil in a small frying pan (20cm diameter) and pour in the ingredients. Cook on a low-medium heat for about 20 mins.
  9. Now for the tricky bit! In order to cook both sides evenly you need to turn the tortilla over near the end of the cooking time. So when the tortilla is almost cooked through take a plate and place it over the top of the pan. Toss the pan over the plate allowing the tortilla to drop onto the plate. Then slide the tortilla back into the pan with the uncooked side on the bottom. Cook for another 3 minutes.
  10. Serve with salad and slices of cold meats such as jamón Serrano and chorizo.

Ensalada Malagueña

Malaga salad

image

Spanish oranges (naranjas) are in season between January and March, so I’ve squeezed this recipe into the blog as a celebratory farewell (hasta el año que viene)! It may seem surprising to add oranges to a potato based salad but their sweet, tartness really lifts the dish beautifully and is perfect for al fresco eating. This salad is often made with bacalao (salted cod) however here I’ve used tuna as it has a lighter flavour.

As a child Juani would go to José’s local corner shop with a small tub and buy 2 pesetas worth of tuna which he would spoon out the from the shop’s own large tin on the counter. This would be shared by the entire family of seven, so mixing it into a salad allowed it to go further.

Serves 4

Ingredients

2kg new potatoes
4-6 spring onions
4 eggs
300g tuna/ bacalou
2 oranges
Good handful of green olives stuffed with red peppers (pimentos)
10 tbs extra virgin olive oil
3 tbs white wine vinegar
Salt

Method

  1. Place the potatoes in a large sauce pan and boil them in their skins (15 – 20 mins). Drain and leave aside to cool.
  2. Now hard boil the eggs (10 mins). Once cooked place in cold water to cool.
  3. Meanwhile finely chop the spring onions and slice the olives.
  4. Peel the the cooled potatoes using the back of a knife and cut into quarters (or bite size pieces)
  5. Shell the eggs and cut into quarters.
  6. Peel and slice the orange.
  7. Place the chopped ingredients in a large mixing bowl and add the tuna, olive oil, vinegar and salt. (Leave aside one of the sliced eggs, half the tuna, a few slices of Orange and olives for garnish)
  8. Now mix thoroughly taking care not to break up the eggs.
  9. Turn the ingredients into a serving dish and garnish with the saved ingredients.

Garbanzos con bacalao

Chickpeas with cod image This dish is traditionally eaten during Semana Santa (Holy Week) – the week leading up to Easter Sunday. The warmth of the chickpeas combined with the chunky succulent texture of the cod works incredibly well together and the simple sauce brings the dish alive. Chard (acelga) is usually used, but can be substituted with spinach which I have done here.

Fish tales and other stories Bacalao or salted cod has been a staple across Spain for over 600 years.  Not found along the Spanish coastline, the fish thrives in the colder waters of the northern and western Atlantic.  The Basques were the first to venture across the ocean, risking there lives in search of cod. It is said that they found the Americas long before Columbus, discovering the bountiful fisheries of Newfoundland.  Salt was used to preserve the fish and prevent it from spoiling during the return leg of the journey. Unlike the salted oily fish of the time, bacalao didn't spoil and as such its popularity grew across the country. By the 1500s bacalao had become an affordable, staple food, providing a rich source of protein all year round.
Fish tales and other stories
Bacalao or salted cod has been a staple across Spain for over 600 years. Not found along the Spanish coastline, the fish thrives in the colder waters of the northern and western Atlantic. The Basques were the first to venture across the ocean, risking their lives in search of cod. It is said that they found the Americas long before Columbus, discovering the bountiful fisheries of Newfoundland. Salt was used to preserve the fish and prevent it from spoiling during the return leg of the journey. Unlike the salted oily fish of the time, bacalao didn’t spoil and as such its popularity grew across the country. By the 1500s bacalao had become an affordable, staple food, providing a rich source of protein all year round.

Serves 4 Ingredients 1kg cooked chickpeas/ 500g dried chickpeas 500g cod 200g spinach/ chard 3 cloves of garlic 1 red pepper roughly chopped 1/4 of a stale white baguette 4 bay leaves 1tsp sweet paprika 500ml vegetable stock Extra virgin olive oil Method

  1. Preparing the chickpeas – If using dried chickpeas soak them in plenty of cold water overnight to rehydrate. Drain the excess water and rinse the chickpeas thoroughly. Place them in a large saucepan of salted water along with 2 bay leaves and bring to the boil. Cook for 45-60 mins or until soft. (If you have a pressure this will only take 20 mins). Once cooked drain, remove the bay leaves and leave aside. If using canned chickpeas drain, rinse and leave aside.
  2. Take the skin off the garlic cloves and leave whole, chop the red pepper roughly and rip the bread apart into 2cm cubed pieces (these ingredients are destined for the blender so you don’t have to be too precise)!
  3. In a frying pan add a generous glug or two of olive oil and gently fry the garlic for about 3 mins or until slightly golden.
  4. Remove the garlic and leave aside.
  5. In the same frying pan add the bread and fry until golden.
  6. Put the the fried bread, garlic and raw pepper into a blender / pestle and mortar and blend into a paste.
  7. In another pan add your stock, paprika and 2 bay leaves. Heat the pan so that the stock begins to simmer and add the pieces of cod. Poach the cod for about 10 mins or until the flesh starts to fall apart. Remove the fish from the pan.
  8. Once the cod is cool enough, remove the skin and break the flesh into small pieces.
  9. Now add the chickpeas, paste and spinach to the poaching water. Stir well.
  10. Once the spinach starts to wilt gently stir in the pieces of cod.
  11. Serve with a good hunk of bread.

Arroz a la Abuela Maria

Grandma Maria’s rice

image

image
Vendedoras de rosquillas en una calle de Sevilla (Manuel Wassel de Guimbarda, 1833-1907)

This is a humble version of a paella, and is absolutely delicious. My grandmother made it for the family using what few ingredients she could afford and would chargrill the red pepper on an anafre or anafe de carbon. This is a portable stove like bbq which would have been placed outside the home and was typically used to grill fish. The traditional anafres were earthen however Maria’s was made and sold by local gypsies using a large recycled tin can. A hole was cut out of the bottom to fan the flames and another at the top on which a grill would have been placed.

This dish with its vibrance of colours brings a real warmth to the table particularly on a cold winter’s day and is ideal for veggies as the tuna is optional. Delicious on its own, a simple salad dressed with olive oil and white wine vinegar compliments the dish perfectly.

Serves 4

Ingredients

1 small onion
3 cloves of garlic
1/2 green bell pepper (use another colour if you prefer)
1 red bell pepper (grilled whole so don’t chop it up!)
250g easy cook rice
A handful of garden peas (frozen or fresh)
1 tin of tuna (optional)
1 litre chicken or vegetable stock
1/2 tsp turmeric
2 bay leaves
Extra virgin olive oil
Salt to taste

Method

  1. Firstly place a whole red pepper under the grill. You’ll need to keep a watchful eye on it and gradually turn the pepper when the skin is charred. Do this until the whole pepper is grilled. Leave aside to cool.
  2. Finely chop the onion, green pepper and garlic.
  3. Add a good glug of oil to a large saucepan or sauté pan. Heat the oil and add the onions and cook for 2 minutes on a low to medium heat.
  4. Add the chopped green pepper and garlic and cook for 20 minutes or until the vegetables are soft. Stir occasionally.
  5. Rinse the rice under a cold tap to remove any excess starch and add to the pan. Give the ingredients a good stir, coating the rice with the oil and vegetables.
  6. Add the stock, turmeric and bay leaves and bring to the boil. Turn down the heat to simmer, stirring occasionally. Add a little more water to the pan if the rice starts to stick.
  7. After 10 minutes add the peas and cook for another 10 minutes.
  8. Stir in half the tuna.
  9. Core and peel the grilled red pepper and slice length ways.
  10. To serve add the rice to the dishes and add a few strands of the sliced pepper and a sprinkling of the remaining tuna.

Potaje de lentejas

Lentil stew image This  is a delicious, homely meal which is super easy to make and takes minutes to prepare. This was one of my favourite meals as a child and I still enjoy it today. Today lentejas often include meats, such as chorizo or morcilla (black pudding) however here I’m keeping it veggie as this is how it would have been made when meat was a luxury (and it’s super healthy!)

Serves 4

Ingredients
250g green lentils
1 celery stick
1 medium onion
1 small bulb garlic (yes really a whole bulb!)
1 carrot 1 medium tomato
1/2 green bell pepper (or 1 pointed green pepper)
1 medium sized potato 1 litre of stock (chicken or vegetable)
1 tsp sweet paprika 2-3 bay leaves
Glug of extra virgin olive oil Salt (to taste)

Method

  1. Place the green lentils in a saucepan of cold water and bring to the boil. This will help remove the scum formed when cooking lentils and will give a cleaner taste when cooked. Allow to boil for 2 minutes then rinse the lentils under a cold tap. Leave aside.
  2. Chop the celery, onion, carrot, pepper and potato roughly and place into a deep sauce pan.
  3. Add the whole bulb of garlic, olive oil and lentils
  4. Add the stock, paprika, bay leaves and season.
  5. Bring to the boil and simmer with the lid on for 1 and a half hours.
  6. That’s it – dinner is served!